%201.png?width=146&height=103&name=Slice%203%20(72)%201.png "JV Logo")

How many design changes are you forced to make after tooling has already begun? If the answer is anything more than zero, the prototyping phase didn’t fulfill its ultimate purpose.
When clinical efficacy depends on micron-level tolerances and absolute material integrity, the gap between a functional model and a production-ready design is where programs lose momentum, budget, and credibility.
Success requires a “manufacturing-first” approach by bridging that gap through extreme precision, rigorous material validation, and DFM-led iteration.
This guide explores how to structure your prototyping process to ensure your device is ready for scaled production and validation without the eleventh-hour surprises.
What Is Medical Device Prototyping for OEMs?
Medical device prototyping is the process of building physical parts to validate design intent and reduce risk before committing to full-scale production.
For OEMs, it’s not a single event; it’s a deliberate sequence of decisions where each prototype is designed to answer specific questions and close the gap between concept and something you can reliably manufacture.
Prototypes fall into three categories:
- Appearance prototypes
- Functional prototypes
- Production-intent prototypes
While appearance prototypes validate form and fit, they typically lack production-grade materials. Functional prototypes bridge this gap by verifying performance with materials that approximate the end product.
However, for the medical device OEM, the production-intent prototype is the true benchmark.
These are built using actual materials and specified processes, mirroring the exact tolerances and surface conditions required for the final device.
This is the stage where regulatory pathways, traceability, and scale-up readiness converge, and the earlier you reach it, the fewer manufacturing risks you’ll face down the line.

How Medical Device Prototyping Works
The most common reason OEM programs overrun timelines isn’t due to one single failure. Most often, it’s the accumulation of small assumptions that were never formally tested.
By following a manufacturing-first roadmap, you ensure that every iteration brings you closer to a validated, high-volume production reality.
Step 1: Translate Clinical Needs into Technical Requirements
Before any geometry hits a machine, the process begins by converting high-level user needs into documented design requirements.
This stage identifies the intended use, critical performance targets, and necessary interfaces with other devices or the clinical environment.
Establishing these design inputs early prevents scope creep and ensures the prototype is measured against the correct benchmark.
Step 2: Prototype for Specific Learning Objectives
Not every prototype needs to perform every function. Vague requirements result in 'gold-plated' models that answer irrelevant questions while leaving critical risks unaddressed.
Successful OEMs isolate exactly what they need to prove in each cycle — whether it is ergonomic fit, mechanical function, long-term durability, or manufacturability.
To maximize the ROI of each loop, every iteration should be strictly scoped for one or more of the following:
- Fit and Assembly: Validating component interfaces and spatial constraints within the device envelope.
- Fatigue and Performance: Testing the physical limits of the design under simulated user conditions.
- Achievable Surface Finish: Determining if the specified texture or edge condition (such as a burr-free finish) is repeatable.
- Tolerance Capability: Identifying whether the design can survive "stack-up" issues once moved to production processes.
By selecting the right fidelity for the right question, you accelerate the learning curve without the "gold-plating" of early models.
Mixing these variables in a single cycle creates ambiguity; when a multi-functional prototype fails, it becomes nearly impossible to conduct a clean root-cause analysis on what actually went wrong.
Step 3: Build, Test, and Iterate with Feedback Loops
Prototyping is inherently iterative; it is a series of calculated cycles where each loop is designed to reduce technical uncertainty. In medical device development, speed is not achieved by cutting corners, but by maintaining tight feedback loops between the design team and the manufacturing floor.
During this stage, the focus shifts from Does it work? to Does it work consistently under stress?
By identifying failure modes like material fatigue or assembly interference early, you can refine the design before the costs of change become too expensive.
Every iteration should yield data that informs the next build, ensuring that by the time you reach the final prototype, the design is fully de-risked.
Step 4: Prepare for Verification, Validation (V&V), and Scale-Up
For most OEMs, the end goal is not just a working device, but a production-intent design ready for regulatory scrutiny. Competitors often treat production scaling as a separate, later step, but a manufacturing-first approach treats production readiness as a core requirement of the prototyping phase itself.
This is where the bridge to production becomes a reality. In Step 4, prototypes must be built using production-representative materials and processes to ensure they can withstand Verification and Validation (V&V) testing.
Transitioning to this level of fidelity early ensures that when you move to high-volume tooling, the device performs exactly as it did in the lab.
Prototype vs. Full-Scale: Why Bridge Production is the Essential Middle Ground
Low-volume production is a critical step in the transition to full-scale manufacturing. It involves creating parts using production-intent processes and controls, scaled appropriately to allow for the statistical evaluation of process capability, but without the need for the full investment in tooling.
For Original Equipment Manufacturers (OEMs) transferring an existing program to a new, more capable supplier, this "bridge-to-production" phase is where the new partner proves their process and generates the necessary manufacturing records to support re-qualification.
A supplier who offers in-house capabilities simplifies this transition by eliminating variables that often arise from managing multiple external supply chain partners.
Why Precision Engineering Defines Medical Device Prototyping Success
In medical device manufacturing, precision is not a performance differentiator; it’s a safety requirement. A connector that fails to mate, a housing without a seal, or an implantable component with residual stress: these aren't just quality issues—they are clinical risks.
True precision during the prototyping phase requires a partner who treats tolerances as non-negotiable inputs. This means:
- Holding micron-level tolerances exactly as the design requires.
- Producing burr-free edges where any presence of a burr creates a functional failure or a cleanliness risk.
- Achieving the specified surface finish on the prototype used for testing, rather than waiting for the third iteration to dial in the process.
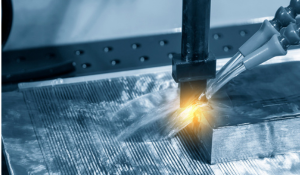
This is where Electrochemical Machining (ECM) becomes a strategic necessity for medical device OEMs. Because ECM is a non-contact process, it eliminates the mechanical and thermal stress typically found at the tool interface.
It produces genuinely burr-free outputs and maintains intricate geometries in hard-to-machine metals without the distortion common in conventional machining.
For components where edge condition and surface integrity are specified, this capability is not just an advantage—it is essential for validation readiness.
The OEM Advantage: Design For Manufacturability
For medical device OEMs, the most expensive design revision is the one that occurs after tooling has been commissioned.
Designing for manufacturability early can reduce costs, risk, and timeline slips. Design for manufacturability (DFM) is the strategic process of ensuring a device moves from a "works once" prototype to a "manufacturable repeatedly" production run without costly rework.
By engaging with a manufacturing partner early, engineers can identify features that are difficult to machine and adjust the design before expensive dies or fixtures are built.
Common Pitfalls of Prototyping Without DFM
Neglecting DFM during the iterative phase often leads to "program slips" caused by preventable manufacturing bottlenecks, such as:
- Tolerance Stack-ups: Failing to account for how individual component variances accumulate can lead to functional failure in final assembly.
- Unrealistic Features: Designing geometries that look good in CAD but are impossible to produce consistently using standard or even advanced processes.
- Sub-Optimal Edge Conditions: Overlooking the need for burr-free edges early, leading to cleanliness or functional risks during validation.
- Inspection Bottlenecks: Designing parts that are difficult to measure, which slows down iteration cycles and complicates traceability.
DFM Checklist for Prototype Readiness
Before moving from a functional prototype to a production-intent run, use this checklist to identify potential issues before they arise:
|
Factor |
Consideration |
Goal |
|
Tolerance Stack-ups |
Have you accounted for how the accumulation of individual component tolerances will affect final assembly? |
Ensure repeatable assembly and functional reliability at scale. |
|
Material Constraints |
Are you using production-grade materials that meet biocompatibility, fatigue, and thermal requirements? |
Validate real-world performance and regulatory compliance early. |
|
Edge & Surface Conditions |
Are the requirements for burr-free finishes or specific textures clearly defined and achievable? |
Eliminate secondary finishing risks and ensure patient safety. |
|
Inspection Bottlenecks |
Is there a defined metrology strategy for measuring critical dimensions during production? |
Accelerate iteration loops and ensure downstream traceability. |
|
Feature Realism |
Are there complex geometries better suited for ECM or EDM rather than standard CNC machining? |
Avoid "unrealistic" features that drive up cost or cause failure at scale. |
Choosing Prototype Technologies & Processes
The method used to manufacture a component significantly influences the information gathered about it. If a prototype is 3D-printed in resin, but the final production part is to be CNC-machined from stainless steel, the observed behavior might not accurately reflect the performance of the production-ready component.
For medical device OEMs, this inconsistency is a serious risk, especially since test data is essential for regulatory documentation.
|
Process |
Best for |
Material Fidelity |
Precision |
Scale-up Path |
|
CNC Machining |
Functional validation production-intent builds |
High Uses actual production materials |
Excellent Tight tolerances and finishes |
Direct Programs carry into production |
|
ECM |
Complex geometries, burr-critical features, hard alloys |
High Production representative metals |
Superior No stress, burr-free, mirror finish |
Scales to high-volume ECM production |
|
EDM |
Fine features in hardened or difficult materials |
High
|
High Sharp internal radii, complex contours |
Used in tooling and insert production at scale |
|
Metal Stamping |
Parts destined for stamping production Contacts, enclosures |
High Builds in stamping constraints from the start |
Consistent Driven by the die design quality |
Direct Prototype informs die design |
|
3D Printing |
Form/fit checks, fixtures, early geometry iteration |
Low Printed resins don’t replicate material behavior |
Moderate Varies by printer quality |
Not a production process for medical device components |
CNC Machining
The right choice is when the production part will be machined, when the production-grade material behavior is essential for testing, or when tolerances and surface conditions need to match production specifications.
You can machine from the actual material (titanium, stainless, cobalt, or chrome) and test under conditions that accurately represent production performance.
ECM
Electrochemical machining removes material through a controlled electrochemical reaction, where the tool never contacts the workpiece, providing stress-free complexity for burr-free feature edges, no heat-affected zones (HAZ), and consistent surface integrity across geometries.
ECM is well-suited for tight tolerances in difficult-to-machine materials, internal geometries or thin-wall features, micro holes and slots, and surface finish requirements that conventional processes can’t achieve consistently.
EDM
Use EDM for fine features in hard materials, sharp internal radii, or complex contours in hardened steel or other difficult materials. For tooling-like prototype geometries, like parts that will ultimately be produced through a stamping die or precision insert, EDM produces the feature accuracy to make that validation meaningful.
Metal Stamping
When the end-state production process is stamping for things like electrical contacts, shielding enclosures, or structural features, the most useful prototype is one built with stamping constraints in mind from the beginning.
Design decisions that are easy in a machined prototype can create significant tooling challenges at the stamped die stage. Involving a manufacturer with stamping expertise early is a direct application of DFM that pays for itself before tooling begins.
3D Printing
Use 3D printing for early form and fit checks, fixture fabrication, and rapid geometry iteration before committing to machined parts. What it doesn’t do reliably is replicate the mechanical properties, dimensional stability, or surface integrity of production-grade machined or stamped components.
Use an additive to move fast in early development; transition to production-representative processes when test data needs to reflect production reality.
Validation-Ready Prototyping
Your inspection strategy should be designed at the same time as the prototype itself and not assembled after parts come back from machining. Before you cut the first part, answer the following questions:
- What features carry the most risk if you’re out of specification?
- What measurement methods are required?
- Are they traceable to the standards your regulatory pathways require?
When inspection is planned proactively, measurement cycles are faster because fixtures and programs are ready when parts arrive.
Faster measurement cycles mean faster interaction loops, which is the most direct way to compress development timelines without taking on engineering risk.
Inspection planning also surfaces traceability requirements early, keeping development and regulatory tracks aligned from the start rather than requiring a retrofit before V&V.
Prioritizing Cleanliness in Prototyping
Cleanliness is an essential manufacturing input, not merely a final step. Residual materials from machining can negatively impact the reliability of testing, subsequent assembly steps, and the eventual success of cleanliness validation.
It's crucial not to confuse two distinct requirements:
- Prototype Testing Cleanliness: Parts must be free from process residue to a level that guarantees test results accurately reflect the design's intended performance.
- Validated Sterilization: Regulatory requirements for validated sterilization pathways (such as EtO, gamma, and autoclave) apply only to the finished medical device and are separate from prototype cleaning standards.
Therefore, cleanliness must be treated as a controlled process variable during the prototype stage. Before committing to a prototyping project, you should thoroughly investigate your partner's methods for:
- Controlling process residues
- The specific cleaning processes they utilize
- How cleanliness is verified
By addressing these variables upfront, you ensure your prototyping phase is a reliable predictor of your final product's success and compliance.
Build Medical Prototypes That Are Ready for What Comes Next
To successfully move a medical device from concept to commercial reality, OEMs must approach prototyping with a manufacturing-first mindset.
Success requires more than just functional validation; it demands integrating Design for Manufacturability (DFM), using production-grade materials and processes like ECM and precision machining, and establishing a rigorous inspection and cleanliness strategy early on.
When OEMs treat the prototype not as the finish line but as the master template for a scalable, compliant, and repeatable manufacturing process, they significantly cut late-stage risk, move through V&V faster, and enable a smoother, more cost-effective ramp to high-volume production.
Request a Quote on your OEM prototype to talk to a JV Manufacturing engineer about your design, timeline, and production goals.

ECM Vs. EDM Machining: What’s the Difference?
EDM's Capabilities in Medical Parts Manufacturing